Crafting seasonal collage projects with nature’s elements is a fun and creative way to explore the changing environments around us. These projects not only foster artistic expression but also connect people to the beauty of nature. By using items like leaves, flowers, and twigs, anyone can create unique pieces of art that reflect the seasons.
This engaging activity is perfect for individuals of all ages, encouraging them to gather materials during nature walks. It provides an opportunity for families and friends to bond while appreciating the outdoors. Seasonal collages can also be a wonderful way to teach children about the natural world and its cycles.
As the seasons change, so do the colors and textures found in nature. Making collages allows for endless creativity while celebrating the beauty of each season. By diving into these projects, anyone can create lasting memories and meaningful art that showcases their surroundings.
The Beauty of Nature’s Palette
Nature is a treasure trove of colors and textures. Each season brings unique materials that inspire creativity. From vibrant autumn leaves to delicate spring flowers, these elements can transform art projects.
Here are some popular natural materials to use:
- Leaves: They come in various shapes and colors.
- Flowers: Fresh or pressed, they add beauty.
- Sticks and Twigs: Perfect for structure and design.
- Pinecones: Great for adding dimension.
Using these elements, children can explore their artistic side. Creating collages with nature not only boosts imagination but also fosters a connection with the environment.
For example, a child might gather colorful leaves and arrange them on paper. This activity sparks curiosity and encourages outdoor learning.
In addition, DIY projects like flower crowns or leaf rubbings allow for personal expression. They can also help children appreciate the world around them while having fun.
Nature’s palette is rich and inviting. It provides endless opportunities for crafting memorable and meaningful art.
Essentials for Seasonal Collage Crafting
Creating seasonal collages can be a fun and engaging way to connect with nature. To do this successfully, one needs to gather necessary materials, choose appropriate adhesives, and select a solid base for the collage.
Collecting Natural Materials
When collecting natural materials, it’s important to look for items that reflect the season. In spring, one might gather fresh flowers and bright green leaves. In fall, vibrant leaves, acorns, and pinecones are perfect.
Encourage creativity by exploring different textures and colors. Items like twigs, seeds, and dried flowers can add unique elements. Always ensure that collected materials are safe and sourced sustainably.
Make a list of items to collect before heading outdoors. This can include sticks, leaves, or petals. Having a plan helps in gathering diverse materials for the collage.
Choosing the Right Adhesives
Selecting the right adhesive is crucial for keeping natural materials intact. Common choices include glue sticks, white school glue, and Mod Podge. Each has its own strengths.
For lightweight items like leaves and petals, a glue stick works well. For heavier materials, like twigs, white glue or Mod Podge provides better hold. Always test the adhesive on a small area to ensure compatibility with the chosen materials.
Don’t forget to consider drying time. Some adhesives take longer to set, which may be an important factor in planning the crafting session.
Base Materials for Your Collage
The base of the collage is just as important as the materials used. Cardstock and thick construction paper are popular choices due to their durability. They also provide a sturdy surface for attaching items.
Another option is using a canvas board. This creates a more permanent piece that can be displayed. For a unique touch, one might even consider using wood slices or natural fiber mats.
Make sure the base complements the natural elements chosen. Colors and textures should enhance the final look. Having a well-thought-out base can elevate the collage and make it more appealing.
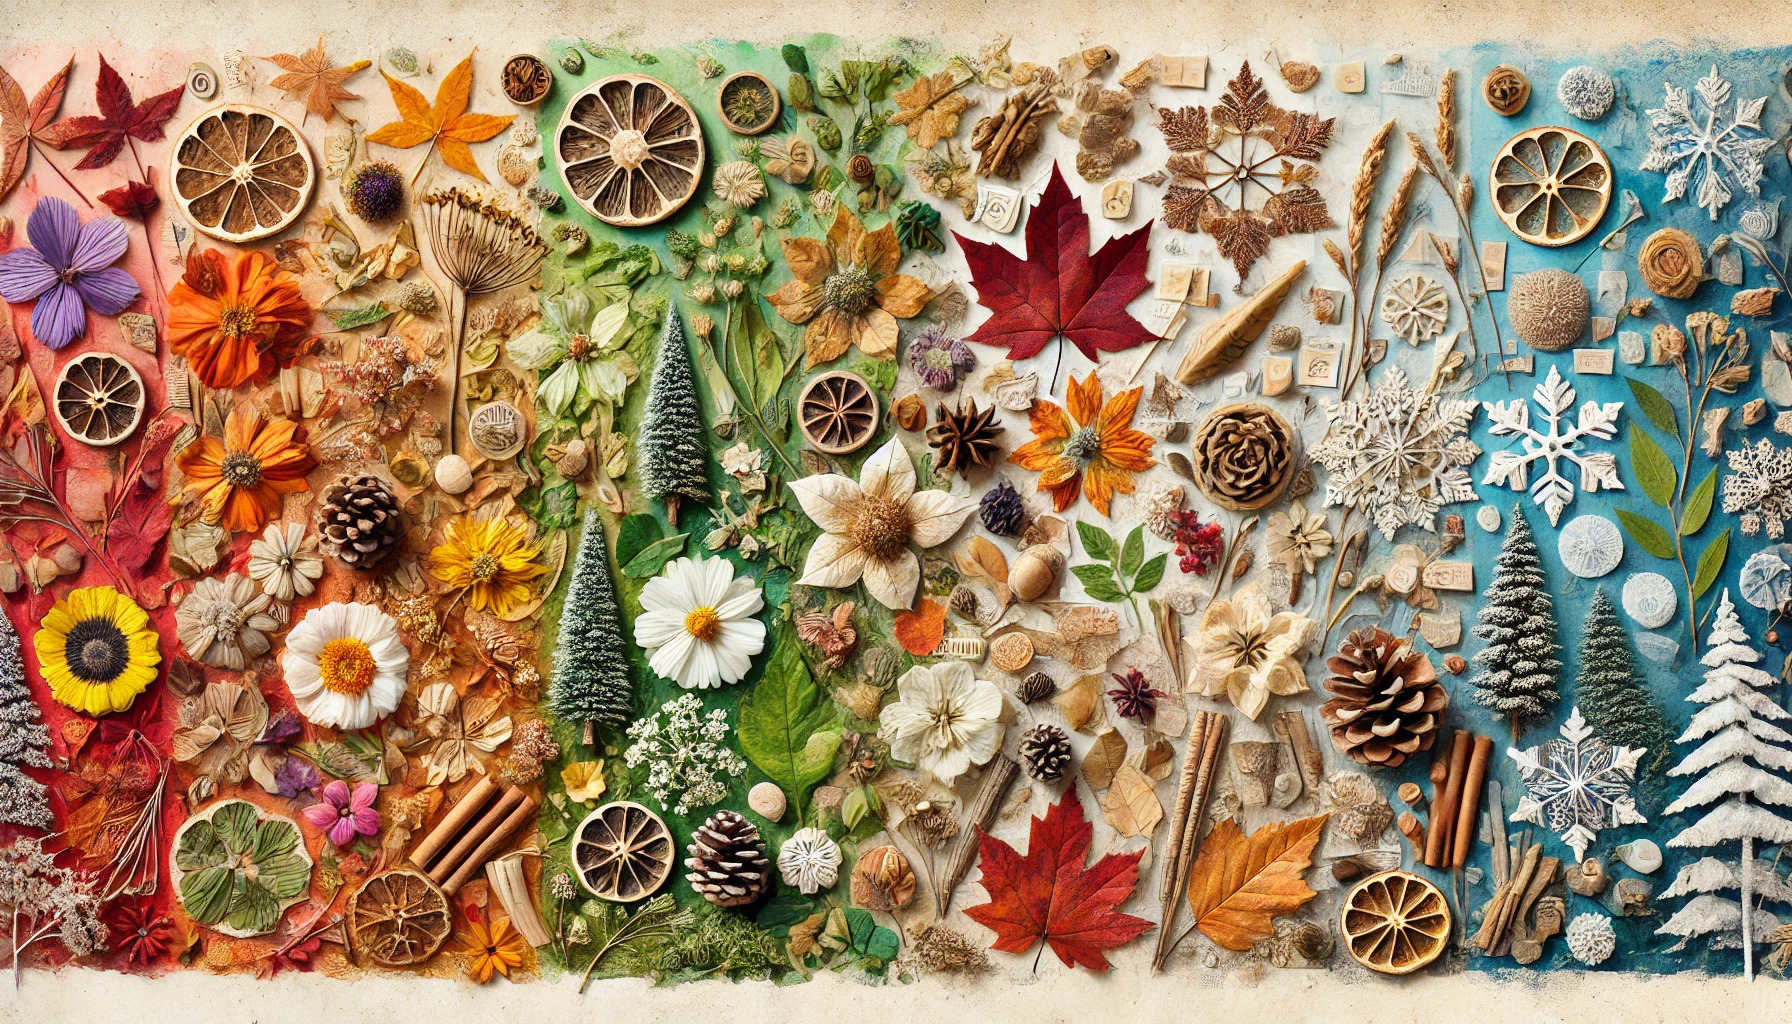
Project Ideas by Season
Creating seasonal collages with natural elements is a fun and engaging way to celebrate the changing environment. Each season offers unique materials and inspiration, making artwork vibrant and fresh.
Spring Awakening Collages
Spring brings a burst of colors, and natural elements can enhance that beauty. Children can collect wildflowers, small twigs, and fresh green leaves to create lively collages.
To start, gather materials on a nature walk. Use a base of cardboard or thick paper. Next, arrange the collected items to form shapes or design scenes that represent spring, like flowers in bloom or leafy trees.
Encourage creativity by adding drawings or watercolor backgrounds. Simple glue sticks can hold everything in place. This project not only taps into nature but also allows for exploration and artistic expression.
Summer Bloom Creations
Summer is perfect for vibrant colors and sunny themes. Kids can gather items like colorful petals, grass, and shells from the beach to craft bright collages.
Begin by setting up an outdoor workspace. Lay down a base such as a canvas or sturdy paper. Children can glue down flower petals and arrange shells to form colorful patterns.
Adding personal touches like drawings of summer scenes can make the collage feel unique. Glitter or sequins can be sprinkled for extra sparkle. This project can be a wonderful way for children to enjoy the warm weather while creating lasting memories through art.
Autumn Leaf Assemblages
Autumn is known for its beautiful leaves in a variety of hues. Collecting leaves, acorns, and pinecones makes for a rich collage experience.
Start by taking an afternoon walk to gather fallen leaves of different shapes and colors. On a piece of sturdy paper, arrange the leaves, layering them to create depth.
Kids can use glue to put leaves in place and even press some between wax paper for a glossy finish. Encourage them to add other natural items like acorns or small branches to enhance their design. This process not only fosters creativity but also allows children to connect with the seasonal changes around them.
Winter Wonderland Scenes
Winter brings its own unique beauty. Crafting collages with items like pine needles, snowflakes made from paper, and twigs can be exciting.
Begin by collecting evergreen branches, small stones, and other winter elements during a stroll outside. Lay these items on a dark paper background to create contrast.
Children can cut out paper snowflakes and glue them onto the collage to add a frosty effect. Adding cotton balls can mimic snowflakes and create texture. This project celebrates winter and encourages imaginative storytelling through art.
Preparing Natural Elements
Gathering natural elements for collage projects is an exciting part of crafting. Proper preparation ensures the materials remain beautiful and usable for creative projects.
Cleaning and Drying
Before using natural elements, they must be cleaned to remove dirt and insects. Gently wipe leaves, flowers, or twigs with a damp cloth. For small items like seeds or pebbles, rinsing under cool water works well.
After cleaning, drying the materials is crucial. Spread them out on a paper towel or a clean cloth. It’s best to air dry for a few hours to prevent mold. For thicker items like branches, hanging them in a dry, warm space can speed up the process. This ensures they hold their shape and can be easily glued later.
Preserving Color and Texture
To keep the vibrant colors and textures, consider using a few preservation techniques. Pressing flowers between heavy books can maintain their shape while keeping their colors intact. She uses parchment paper for easy removal later.
Another option is to use a silica gel. Placing flowers or leaves in silica gel can help absorb moisture and preserve their rich hues. This method allows the elements to retain their natural look.
For added durability, a light spray of acrylic sealer can be used once everything is dry. This protects the elements from fading and enhances their shine.
Techniques for Texture and Depth
Adding texture and depth to a collage brings it to life. Using various techniques can elevate the visual appeal of artworks, making them more engaging and dynamic.
Layering Techniques
Layering is a core technique in creating depth. It involves placing different materials on top of one another to build a rich, textured surface.
Artists can use natural elements like leaves, flower petals, or twigs. Each layer adds a unique quality, enhancing the artwork’s complexity.
To achieve the best effect, it’s helpful to experiment with various thicknesses and colors. For example, using lighter materials on top of darker ones can create contrast that pulls the viewer’s eye.
A simple tip is to start with a base layer of paper or fabric, then build with organic materials. This method not only offers visual interest but also connects the artwork to nature.
Creating Shadow and Light
Light and shadow significantly impact the perception of depth. By incorporating elements that create contrast, artists can make their collages feel more three-dimensional.
Using darker materials in the background can help lighter elements stand out. Shadows add depth and make objects appear as if they are popping off the canvas.
Another approach is to position materials at different angles. This technique allows light to hit them in varied ways, creating interesting shadow effects.
For example, if an artist uses a dried flower, placing it at a slight angle can cast a shadow on the background. This small detail can dramatically enhance the artwork’s overall depth and texture.
Integrating Mixed Media
Using various elements in collage projects allows for unique and creative expressions. By combining materials like paper, fabric, paint, and found objects, one can achieve depth and texture in their artwork. Each component adds its own character to the piece.
Incorporating Paper and Fabric
Paper and fabric are staples in mixed media collage. They can be used to build layers, create texture, or add color. Printed papers like newspapers, magazines, and scrapbook sheets work wonderfully for backgrounds.
Fabric scraps can add warmth and dimension. Using cotton, burlap, or lace can create interesting contrasts. To attach these materials, a reliable adhesive like Mod Podge or a strong glue stick can be effective.
When layering, it’s important to consider the composition. Start with larger pieces and build up with smaller ones. This method allows the viewer’s eye to travel across the artwork easily.
Adding Paint and Markers
Paint and markers bring vibrancy and personalization to collages. They can fill in gaps or enhance details. Acrylic paints are a popular choice for their quick drying time and rich colors.
Markers can be used for fine details and outlines. They help define shapes and add visuals that stand out. Mixing different types of paint, like watercolor or spray paint, can also create interesting effects.
Experiment with techniques such as splattering or stamping. These methods can bring energy and spontaneity to the project. Choosing a color scheme helps maintain visual harmony throughout the artwork.
Using Found Objects
Incorporating found objects introduces a unique element that can tell a story. Items like leaves, twigs, buttons, and beads can be included to enhance the artwork. They add not only texture but also personal meaning.
Carefully select items that complement the overall theme. Organize these items before gluing them down to find the best placements. When applying them, a strong adhesive ensures that these treasures stay in place.
Using found objects can lead to unexpected discoveries. Each piece can spark creativity and encourage exploration in the artistic process. This approach makes the collage not just a piece of art, but a collection of memories and experiences.
Themed Collage Projects
Themed collage projects allow crafters to express creativity by focusing on specific elements found in nature. By selecting themes like wildlife, seasonal landscapes, or abstract interpretations, individuals can create visually stunning pieces that highlight the beauty of the natural world.
Wildlife and Flora Focus
Wildlife and flora-focused collages celebrate the beauty of animals and plants together. Crafters can gather materials like leaves, twigs, and flowers to create a scene showcasing local wildlife. This type of collage encourages children to learn about different species and their habitats while engaging in hands-on creativity.
To start, they can define a specific animal or plant to highlight. Items such as feathers or small branches can symbolize wildlife, while colorful leaves and petals add variety. Arranging these items can be both educational and artistic as it forms a picture of an ecosystem.
Encouraging kids to research their subject can deepen their connection to nature. They can learn about the importance of each species and understand how they relate to one another in their environment.
Seasonal Landscapes
Seasonal landscape collages provide a wonderful way to represent the changing beauty of nature throughout the year. Crafters can use vibrant autumn leaves, winter snowflakes, or spring flowers to depict a specific season. This project can also teach about seasonal changes and encourage outdoor exploration.
Gathering materials during walks can be a delightful experience. For example, in fall, kids can collect various colored leaves and acorns. In spring, they might gather fresh blooms and grasses.
Arranging these items to create a landscape is the fun part. They can simply glue the materials onto a larger piece of paper or canvas to form trees, fields, or skies. Each collage can express the spirit of the season and inspire conversations about the environment.
Abstract Natural Collages
Abstract natural collages invite crafters to use items in unconventional ways. This approach allows for creativity without specific guidelines. Using materials like pebbles, leaves, and bark, they can create unique designs that evoke feelings rather than specific images.
To create an abstract collage, individuals can start with an idea or emotion they want to express. They might select colors or textures that resonate with them. Layering different elements can create depth and interest.
This process encourages experimentation. Crafters can play with shapes and placements, transforming natural items into art. Abstract collages foster creativity and personal expression while connecting with the materials of nature.
Tips for Displaying Your Collage
Displaying a collage can bring a lot of joy. Here are some friendly tips to help make that art shine!
1. Choose the Right Frame
A good frame can enhance the beauty of a collage. Consider simple frames that allow the artwork to stand out. Natural wood frames work well with nature-themed collages.
2. Use a Gallery Wall
Creating a gallery wall can be a fun way to show multiple pieces. Group collages of different sizes together. This adds interest and showcases more creativity.
3. Consider Lighting
Proper lighting can make a collage look even better. Ensure it is well-lit without direct sunlight, which can fade colors. Spotlights or soft lamps can highlight the details.
4. Create a Display Table
A display table can be an inviting way to show a collage. Place it in a high-traffic area for visitors to admire. Adding decorative items like plants or stones can enhance the theme.
5. Rotate Art Seasonally
Switching out collages with the seasons keeps the display fresh. This encourages creativity and reflects changing nature outside. It also makes for a nice seasonal touch.
Collage Care and Maintenance
Taking care of nature collages is important for keeping them looking great. Here are some simple tips to help maintain their beauty.
Keep them dry. Moisture can damage natural materials. If a collage gets wet, gently pat it dry with a soft cloth.
Avoid direct sunlight. Sunlight can fade colors and weaken materials. Display collages in shaded areas or use UV-protective glass when framing.
Regular dusting. Dust can accumulate on the surface. Use a soft brush or cloth to gently remove dirt and dust. This will help preserve the natural elements.
Store properly. If storing a collage, place it flat in a cool, dry area. Avoid stacking heavy items on top to prevent damage.
Repair when needed. Sometimes, pieces may come loose. Use non-toxic glue to reattach items carefully.